
Temperature, Timing, and Safety
It's easy to remember the "165°F = safe" and the "40°F to 140°F = the danger zone" rules. So much so that it's tempting to think of pasteurization as something akin to dropping a bomb into a fortress full of bacteria, instantly killing them all. But if you take a look at the USDA's charts, the reality is actually quite a bit more complex. Pasteurizing a piece of meat to destroy harmful bacteria is really much more similar to a slow siege, letting the bacteria die off at a steady rate. That rate is affected by the temperature of the meat. So while at 165°F you reach a 7-log10 reduction in bacteria count (that is, for every 10 million bacteria you started with, only one will remain) in under 10 seconds, at 140°F, this process can take almost ten minutes. That said, turkey cooked and held at 140°F for 30 minutes is just as safe as turkey cooked and held at 165°F for 10 seconds. Knowing the safety guidelines for this kind of pasteurization is the key to making sure that your sous-vide turkey is safe. You can find more details on turkey pasteurization along with time and temp in the Anova App's The Food Lab Turkey Guide.So What Time and Temp?
Ok, so we know about safety. What about the more important factor? What actually tastes best?

I started by cooking turkey at five degree intervals for all temperatures between 130 and 160°F, then fine-tuned the most promising results. In each case, I set the target temperature of the sous-vide cooker a couple degrees higher than the target temperature of the turkey—for relatively short cook times like this, it's more efficient to get the turkey up to its final temperature a little bit faster. Based on those results, here are some suggestions. My personal favorite is 145°F for 2 1/2 hours. At this temperature, the breast comes close to traditional roast turkey in texture, but has much more moist, tender meat.
Sous Vide Turkey Temperatures and Time
Very pink, soft, extra-moist Bath Temp: 132°F (56°C) Core Temp: 130°F (55°C) Cook Time: 4 hours
Pale pink, soft, moist Bath Temp: 138°F (59°C) Core Temp: 136°F (58°C) Cook Time: 3 hours
White, tender, moist Bath Temp: 145°F (63°C) Core Temp: 130°F (55°C) Cook Time: 2 1/2 hours
White, traditional roast texture Bath Temp: 152°F (67°C) Core Temp: 150°F (66°C) Cook Time: 2 hours
Skin and Bones
I'd nailed down the temperature I wanted, but that's really only half the battle. Next question: turkey breasts have skin and bones. Do those really make a difference in the end product? I cooked a couple turkey breast halves from the same turkey side by side, one cooked with the skin and bones intact, the other with the skin and bones removed before cooking. Afterward, I removed the skin and bones from the first sample before slicing the two breast halves and tasting side-by-side.

When slices were taken from the thickest part of the breast, there was absolutely no discernible difference between the two. Where small differences did start to show up was near the thinner, tapered end of the breast. The turkey cooked without the skin and bones was slightly mealier and dryer. This isn't because any kind of magical properties that the skin and bones have. They aren't transferring flavor or juices as I've seen suggested. All they're really doing is insulating the meat, acting as an energy buffer so that heat doesn't travel into the turkey quite as quickly.
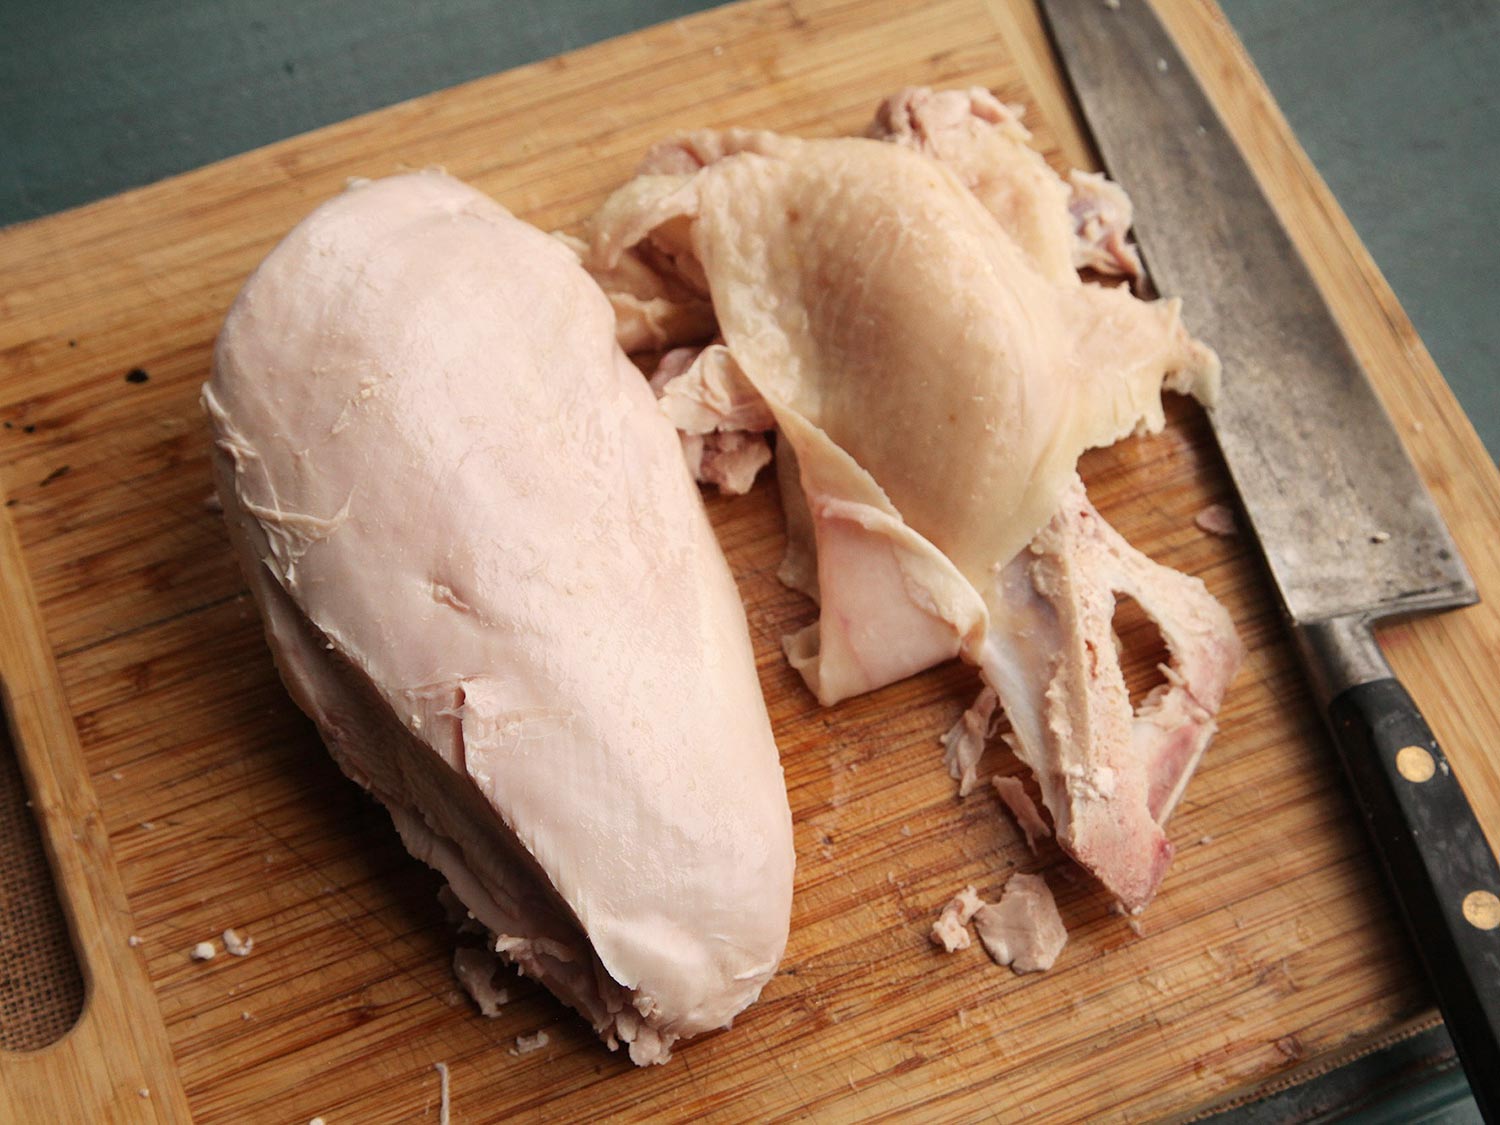
When the thinner end of the turkey is cooked with no skin and bones, it rapidly reaches its target temperature. By the time the thicker part of the turkey is finished, the thinner bit is ever-so-slightly overcooked.Though it seemed that leaving the skin and bones on might be the way to go, I wondered if there was a better way to do it—a method which will allow my to use those skin and bones for better purposes. Short answer: there definitely is, and it's very similar to the method I use in my Deep Fried Sous-Vide Turkey Porchetta recipe.
Shaping Up
The goal is to get the turkey breast to cook evenly, right? To prevent the skinny end from cooking faster than the fat end, all you need to do is find a way to make sure that the turkey is an even thickness throughout. How do you do that? Just remove two breasts and pack them together tops-to-tails, like a jigsaw puzzle. This will create a single large cylinder that is very close to even in radius throughout its whole width. Any minor differences can be evened out with a bit of butcher's twine tied at 1-inch intervals.
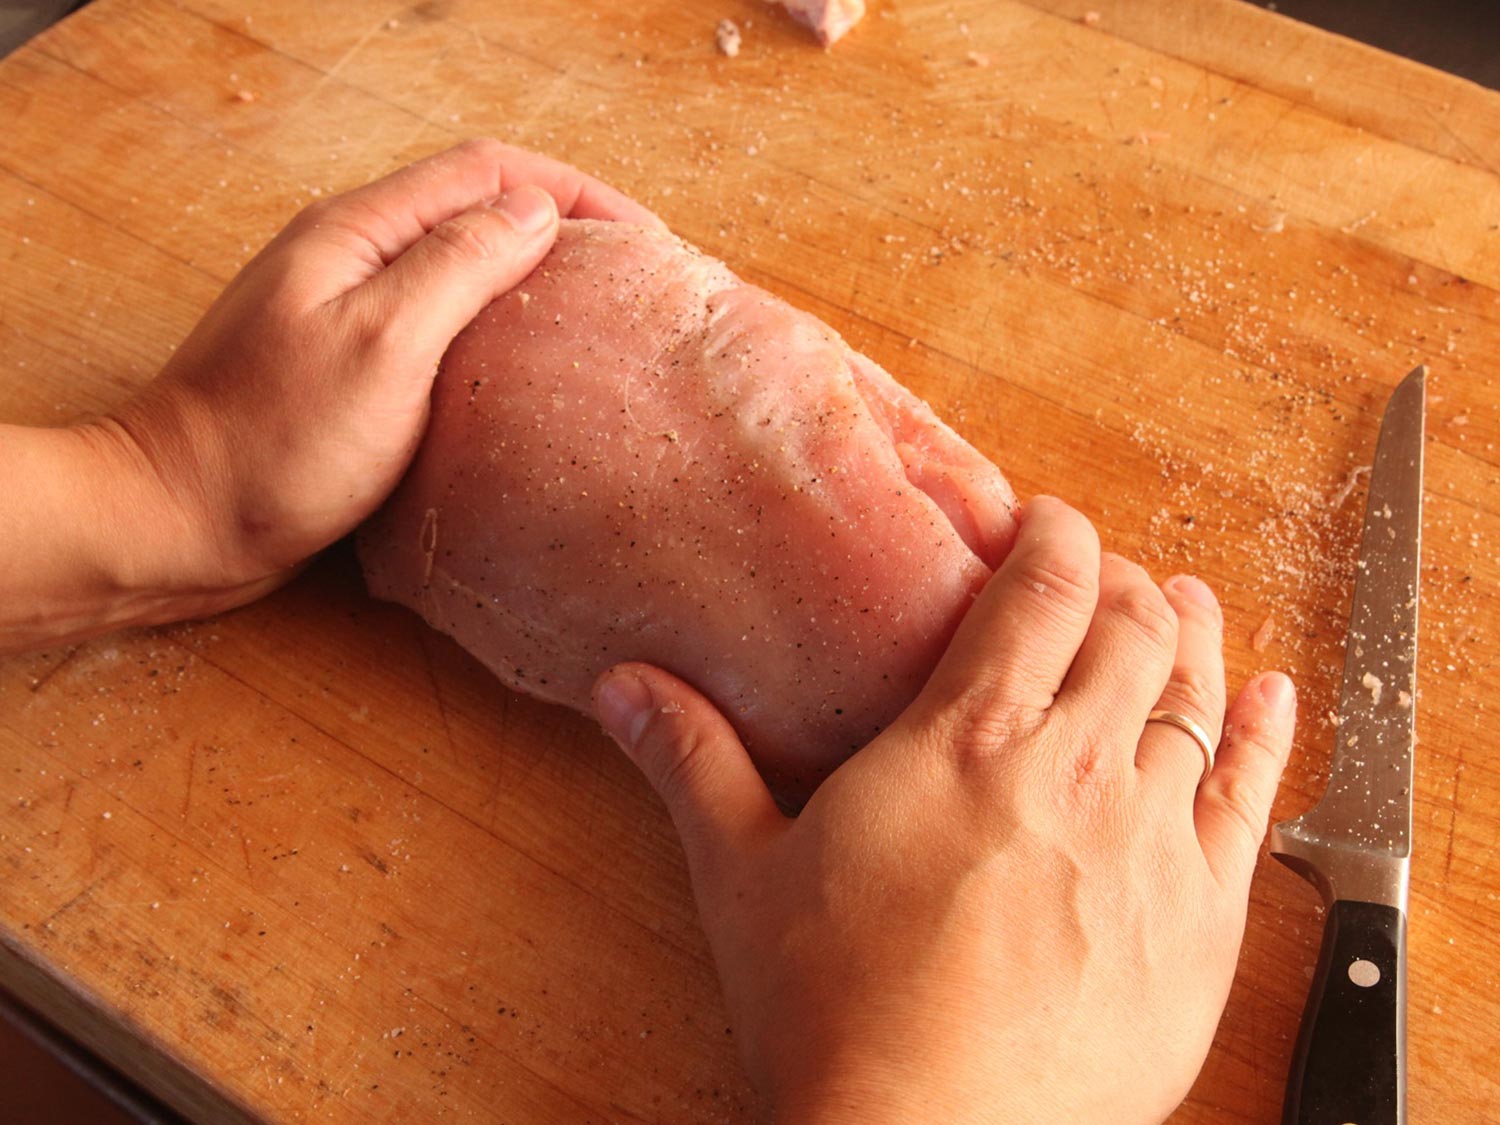
The other advantage to this method is that it allows you to season the interior of the breast roll as well. This is important not only for flavor, but for getting those turkey breast halves to stick together. As the salt works its way into the meat, it dissolves some of the muscle proteins, which in turn can then cross-link with each other, binding the two turkey breast halves together into a single, solid piece of meat (even without the aid of fancy meat glues and such). It's the exact same process that helps a good sausage bind together.

What About That Skin?
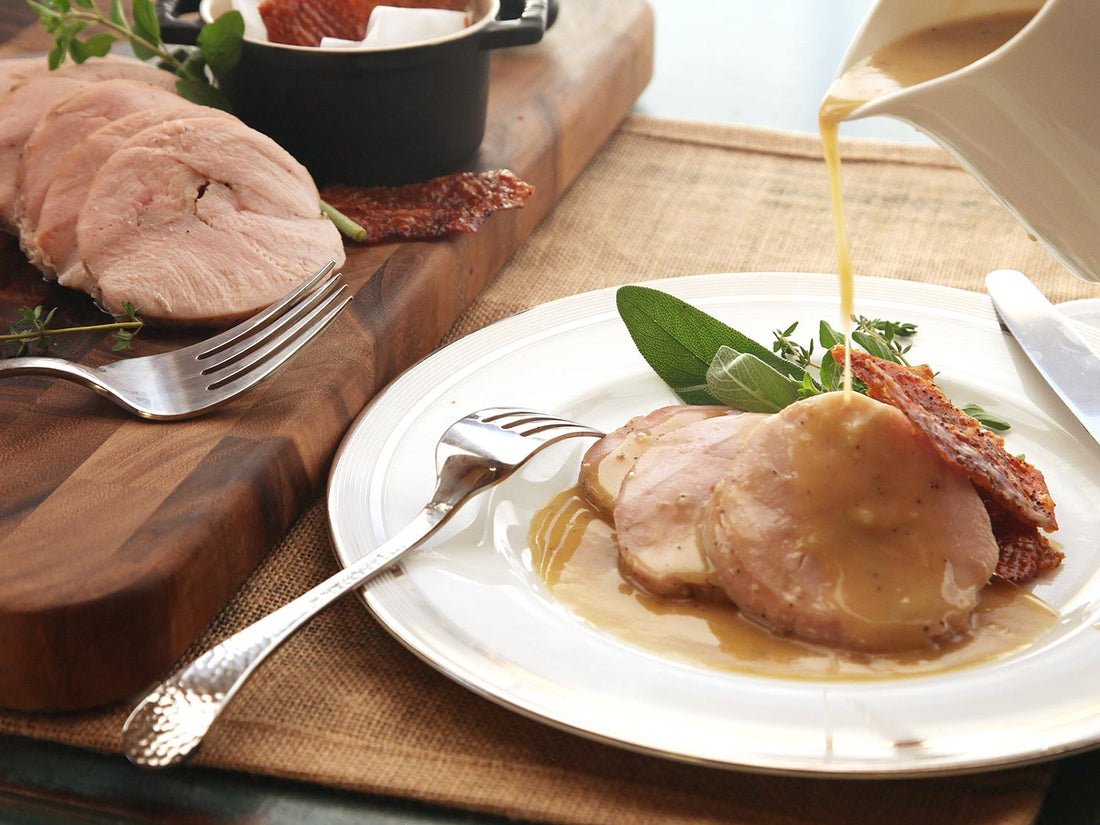
You might've noticed a couple of glaring omissions here thus far. Namely, what about that extra-crisp skin I promised, along with the roasted flavor? When you're roasting a turkey conventionally, that roasted flavor really mostly comes from the skin, as it's the only part of the turkey that's actually getting exposed to the high heat of the oven. For the meat underneath, it couldn't really care less whether it was in an oven or in a water bath—the final temperature is the only thing that matters. Now, with my Turkey Porchetta, I wrap the rolled breast in its own skin before cooking sous-vide then finishing in a deep fryer. This gives it crispness alright, but deep-fried skin doesn't taste anything like roasted skin.The simple solution? Just roast the darn skin on its own. This here is a little trick I learned back when I was working for Ken Oringer in Boston. By spreading the skin out flat on a sheet of parchment, seasoning it well, topping it with another sheet of parchment, then sandwiching it between two rimmed baking sheets, you can roast it in a conventional oven. What you end up with is a single, flat sheet of perfectly crisp skin that can shatter into serving-sized shards.

What's more, because this skin isn't wrapped around steaming-hot turkey meat, it will stay crisp for far longer than the skin on a traditionally roasted turkey, all while delivering on that promise of intense, roasty flavor. I mean, just look at that. With the skin and the perfectly cooked meat, along with a gravy made from the trimmed out breast bone, you've got yourself a Thanksgiving turkey dinner about as close to perfection as I can think of.

For the full, step-by-step process, download the Anova Culinary App for iOS and Android.
7 comments
I have a 14.5 lb Cajun precooked turkey from Popeyes. Can I thaw and reheat with my sous vide?
Hi,
This water cooking is interesting. It needs an English name.
Does anyone make cookware to substitute for the bag?
I have been doing something like this inside a programable instant pot pressure cooker. I use canning jars. The opening is too small for some frozen food and to clean. I cook slow on slow cooker, or faster with the pressure cooker I can make anything in a jar even muffins, or buns. They look more like a 250ml wide mouth jar though.
Any ideas?
Peter
I have a dep fried turkey. I am going to carve it cold, put in sealed bags and reheat by sous vide. How long should I set by Anova Precision to reach 145F for service? I l love my Anova Precision and Combi Oven. Thank you!!
I have a dep fried turkey. I am going to carve it cold, put in sealed bags and reheat by sous vide. How long should I set by Anova Precision to reach 145F for service? I l love my Anova Precision and Combi Oven. Thank you!!
When you say, for example, 130 degrees for 4-hours, do you mean total time? Or does it mean that the core temp should be at 130 degrees for 4 hours? I’ve read articles on sous vide and it all talks about bacteria being killed once the meat is held at a certain temperature for a certain amount of time. That all makes sense but for that you would need to know WHEN the meat reached that core temp and then start timing. Thanks for the help