

I remember the first time I saw someone take a picture of their food. It was probably around 2004 and I was suffering through an uninspired date night with my future ex-girlfriend at a French-influenced restaurant in downtown Santa Rosa called “The Brasserie”. The entrees arrived at the table next to us and I watched as a woman at the table reached into her purse and with the guilt and precision of a seasoned shoplifter, pulled out her BlackBerry and snapped a picture of her artfully prepared chicken. As she slid her phone back into her purse, she glanced over at me and grinned. “Ugh”, I groaned.
I always figured the term “food photography” referred to a professional marketing or advertising process. A company like McDonald's taking a Big Mac, and giving it a plastic induced makeover just to get dummies like me to believe that what I got in the drive-thru might just resemble that perfect looking burger on TV. After all, why bother taking a picture of food if not to get someone to buy it? Even as I taught myself to cook and spent several years being lied to by friends and family when I asked, “How was it?” it still never occurred to me to take a picture of what I had made. After all, I didn’t own a professional camera and I wasn’t selling Big Macs. Furthermore, I thought the term “we eat with our eyes” was the dumbest thing I’d ever heard as no matter how hard I stared at a picture, I was still hungry.
Enter Facebook. Enter Insta and the 16-megapixel phone camera. Enter the golden age of FOMO irony where we’ll miss the concert, just to ensure we get a video of it that we’ll never watch again anyway. I didn’t start taking pictures of my food to share with other people. In fact, when I started snapping the occasional picture of my overcooked chicken or my heaping pile of rigatoni, it was just to remind myself what I had made so I could have ideas the next time I found myself wandering the aisles of the grocery store. But that all changed the first time my plate of pasta accidentally stumbled into the perfect lighting that existed next to my kitchen window for a few hours each evening. I remember looking at the picture on my phone and hardly believing my eyes. This, was my Big Mac.
Several years later, I now regularly take pictures of my home cooked dishes and post them at The Roybal Supper Club on Facebook and Instagram. With my small handful of followers, I’m not an “influencer” nor am I selling anything – but I enjoy sharing my food in pictures that replicate how it appeared in real life. And I only use my phone to take the pictures, I still don’t own a camera and I don’t use lighting contraptions or Photoshop. But I do have a few principles that have greatly improved the quality and feel of my otherwise amateur home cooked and home shot pictures that you can use too:
#1: Lighting
In my opinion, lighting is the SINGLE most important element in photographing your food. And it’s often the most overlooked. Bad lighting, especially bad indoor lighting, can ruin a shot of your dish even when all other things are dialed in. As you’ll notice in most of my food pictures, I prefer diffused lighting which is lighting that reduces both bright glare and harsh shadows. Here are a few tips for letting the right light shine through:
- Find your spots. Every home has at least one good spot inside, and one outside where the lighting is best (depending on the time of day – more on that later). To start, I suggest making a cold dish (salad, crudo, etc.) and walking it around to a few areas near your kitchen, taking a picture at each. Hold your eye rolls folks – you only have to do this once as you’ll know by looking at your pictures where your best spot it. Look for places near indirect natural lighting or windows. These shots were taken on my kitchen island which is about 5 feet from a window that faces north, creating indirect, natural light. I use the blinds to control just how much brightness comes through.


- If it’s dark out and you’re shooting inside, consider indirect lighting from different light sources. During the winter months, I’ve found my coffee table to pick up a great combination of light between the kitchen ceiling lights a few feet away to the left, and the TV straight ahead.What appears to be modernist blue accent lighting is actually just my television!
- For outdoor shots, look for areas that aren’t in direct sunlight and consider what you’ll be placing the dish on and how that will look under your plate. On our East facing covered front porch, we have a little brick retaining wall which serves as my favorite surface to photograph on due to the indirect light. It’s not uncommon for my neighbors to be outside when I’m snapping my pictures prompting me to yell, “you don’t see this!”


As the seasons change it may be dark or light out at dinner time, depending on what time of year it is. This is all the more reason to “find your spots” so you’ll always have a place to go when you churn out that awesome looking dish.
#2: Angle
This may seem obvious here’s the rub: there is no “right” angle. My favorites are straight on/down, or at about a 45-degree angle. But depending on the dish, I will also sometimes shoot directly from the side. Here are a few things to consider about the angle you’re shooting:
- Does the dish have height dimensions? If so, what angle best represents them?
- If you’re not shooting directly down, what’s in the background?
- Do you really want a dusty patio table serving as the backdrop of your beautiful beet and pearl couscous salad?

Shoot them ALL. Often, I will quickly snap several different angles of a dish and then choose the one I like after I’ve eaten. Notice how differently this dish is represented with each different angle.


#3: Filters
One of the most common questions I get about my food pictures is what filters I use. Personally, I believe filters should be used to re-implement what’s lost when a picture is taken (not to make the picture something it never was in real life). Because I don’t rely heavily on them, I only ever use the filters in Instagram and I never use the premade filters and always use the “edit” function to make my own adjustments. So depending on what editor you’re using, the terminology may vary but here are my go-to edits:- Contrast – contrast will accentuate the bright and further dim the shadows. I use this sparingly but it is especially useful in helping a white plate “pop” against your food.
- “Structure” – structure has an effect similar to “sharpening” and will accentuate texture. But beware – when overused, it can make some things such as sliced steak, appear to be stringy or dry (when it’s really not). I use this filter in lower lighting or anytime a picture has “softened” the dish in a way that’s not representative of how it actually looked.
- “Warmth” – the way I explain it, increasing “warmth” leans the image to gold/yellow and decreasing it leans it blue. I usually use this to correct the overall tint of the image and find it especially useful in conjunction with contrast in correcting the color of a white plate.
- “Saturation” – the most abused filter around. Ever seen someone have watermelon radish on their plate and it’s glowing neon pink? That’s saturation. Too much of it. I use this very minimally but it’s very helpful in correcting color dull.
- “Vignette” – another overused filter, we’ve all seen pictures where the dish looks like it’s surrounded by a mysterious dark ring. However, when used lightly and in the right applications, it can add a subtle shadow to the perimeter of the dish, making the dish itself more prominent in the overall picture.
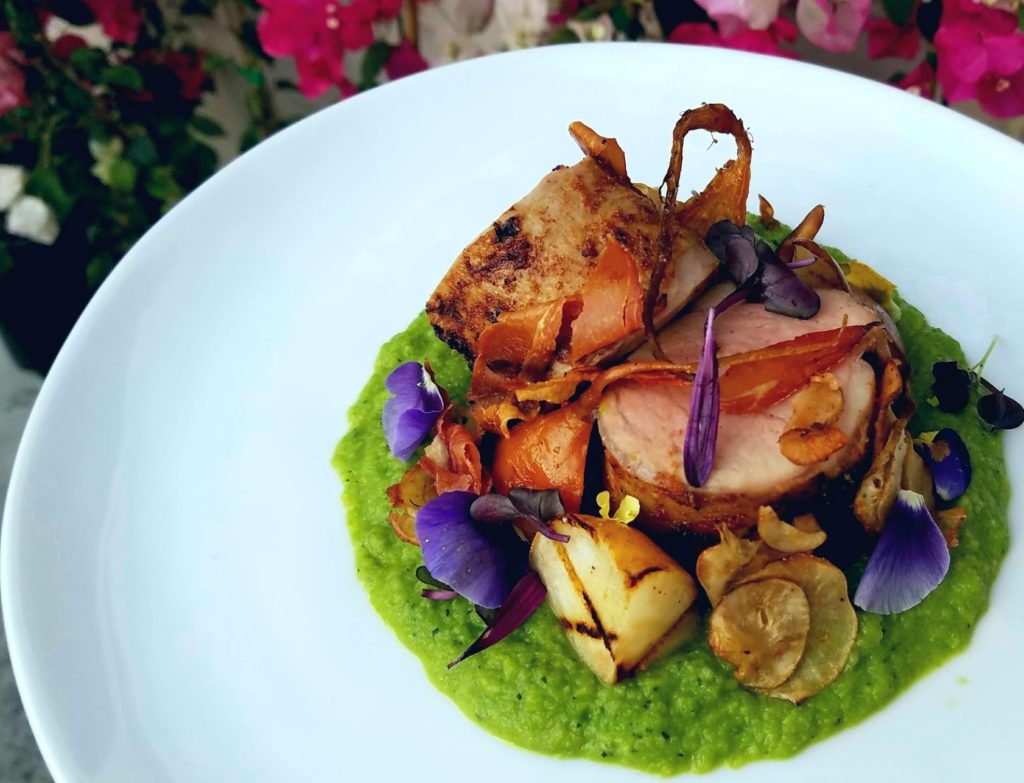
Here you can see the difference these basic filters can make. In the first image (the original), the bright white plate has photographed dull and slightly yellowed. The purple flowers are shadowed and the vibrant green asparagus/lemon/mint puree has a slight brownness to it. In the filtered picture, all of these have been corrected. Having taken the picture, I can tell you the edited picture is much more representative of how the dish actually looked.

And that’s about it. If you were hoping for a Master Class on food photography here, you didn’t get it. But then again, I am just a regular guy with a day job and no training or education in cooking, plating or photography. This is good news however as it means if I can do it, anyone can improve the look of their food in pictures. Now go have your Big Mac moment!