
What is sous vide searing?
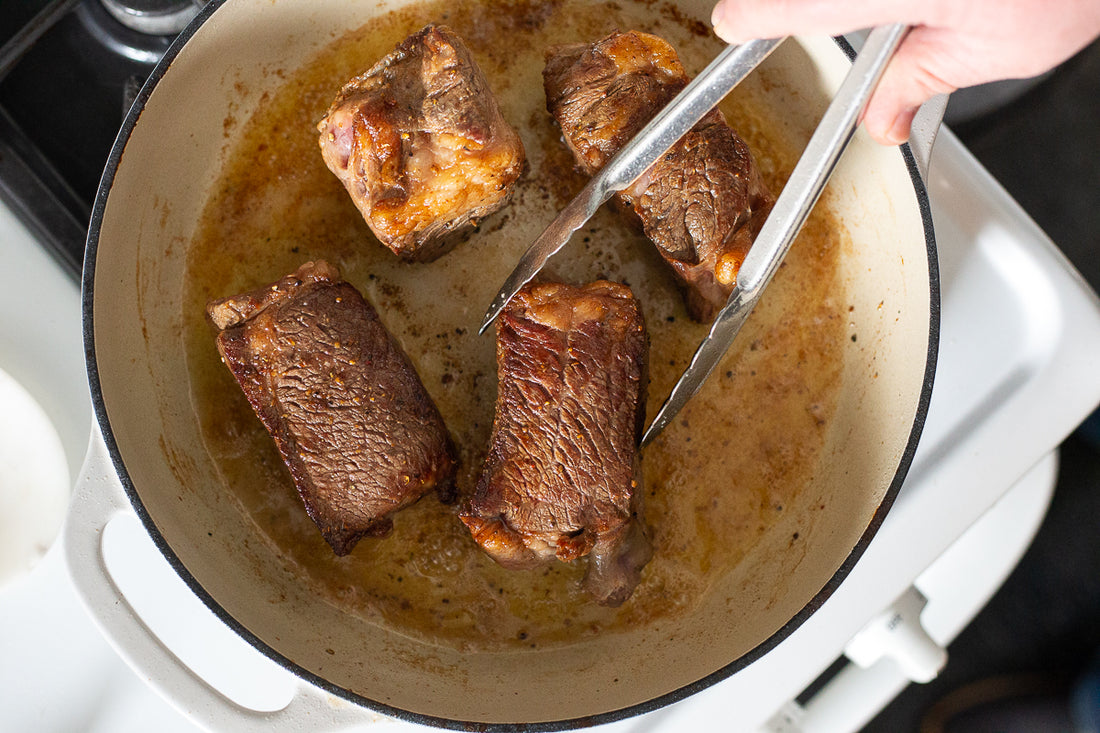
Searing is a cooking technique that utilizes very high heat to create a delicious, caramelized crust on the food surface. This shallow browning method of sous vide searing creates what's called the Maillard reaction, frequently spoken about in sous vide forums. This is a chemical reaction between the reduction of sugars and amino acids that gives caramelized foods their distinctive, delicious flavor. When we sear before fully cooking meat or fish, that's a traditional sear. When we use methods like sous vide to cook the protein first and sear afterwards, it's more often known as a reverse-sear. For the purposes of this article, we'll refer to reverse searing simply as searing.Why do we sear?
As we just mentioned, sous vide searing creates delicious flavor, but there are many other reasons to adopt this technique. Searing usually improves the appearance of sous vide food, creating a greater contrast between the edges and center of precision cooked foodstuffs. Along similar lines, searing after sous vide generates a difference in the texture and flavor of the inside versus outside, which is MUCH more tantalizing to the tastebuds.
Photo credit: #anovafoodnerd @steaknightmagazine via Instagram
Eating is a sensuous experience, meaning we use all of our senses to participate. The more we can harmoniously stimulate them, the more enjoyable of an experience each meal will be.Do I need special tools for sous vide searing?
The short answer is no; you likely have everything you need to sear around the house. Minimum requirements are cooking tongs or a spatula, a frying pan and a heat source, or a broiler. That said, there are a few particular tools that will enhance your sous vide searing technique:
- A cast-iron/stainless/hard-anodized pan
- A blow torch
- A Searzall torch attachment
- A panini press/electric griddle
How hot is hot enough?
The surface of your meat or fish must exceed 300ºF/150ºC to get that pretty brown color, so technically, you can sear at any temperature there or above to achieve it. HOWEVER, searing at lower temperatures will take longer and result in a thicker layer of protein with greater doneness.
To oil or not to oil?
Continuing with the topic of oil, there are conflicting views on this one as it can depend on both the cook and the protein being seared. Higher fat meats may not require additional oil added to the pan. When you DO choose to add oil, a very important thing to consider is the smoke point, which is the temperature at which a cooking oil or fat begins to break down into glycerol and free fatty acids. When this breakdown happens, free radicals along with a compound called “acrolein” (note the same root as the word acrid) are created, giving your food that burnt, bitter flavor. We like use a very small amount of higher-smoke-point fat/oil to coat the pan when pan-searing a sous vide steak. It helps the protein release from the pan and create even more contact between the surface area of the meat and the pan. We designed the MOST complete chart of smoke points out there! Download our printable PDF.
Are there any steps I need to take before I sous vide sear?
YES. To get the most out of searing steak after sous vide – or any other protein –a few extra steps are involved:-
Dry the meat off. All you have to do is pat dry with paper towels, but it's crucial to remove as much water as possible from the surface of the meat. Remember how I said that the surface of the meat must exceed 150ºC/300ºF to get caramelized? Well, water steams at 100ºC/212ºF. If moisture exists when searing a sous vide steak, the water will heat first and steam your meat. No bueno.
-
Season it. Unless you previously brined, it's recommended that you salt & pepper again. This will help to form that yummy, crispy brown crust.
-
Let it sit for a few minutes at room temperature. This allows a little more moisture to evaporate, plus room temperature meat seems to get the best sear.
-
Get your pan SUPER hot. You want it to be so hot that when you flick a drop of water, it jumps around, sizzles, and disappears.
- When the above three conditions are met, add your oil and swirl or brush around the pan. I prefer a silicon brush to make a thin, even layer. When that oil starts to shimmer or ripple, it’s time to drop the meat.
What else do I need to know about how to sear steak after sous vide?
-
You will likely need only 45 - 90 seconds per side if the pan is hot enough.
-
DO NOT CROWD THE PAN. You'll need at least 1”/2.5cm between the pieces, more if possible. Cooking will release extra juices, and again - we do not want to steam this perfectly cooked deliciousness.

- You need consistent surface area contact to sear, so once you drop the meat in the pan, do not flip repeatedly or push it around. Give it 45 seconds, and only then should you try to move or check it.
Are there other ways I can achieve a beautiful crust inside the house without the pan?
YES. We have four more sous vide sear methods to explain:-
Broiler-Searing - Turn your broiler (aka “grill” in many international countries) on “High” and set shelf 4 - 6”/10 - 15cm beneath the heat source. You will need to keep an eye on whatever it is you're browning, because this method cooks protein very quickly. Timing depends on the food you are caramelizing, but in my experience, around 5-10 minutes works best. Smokiness – moderate – and a very consistent color!

- Torching - This is certainly one of the most impressive methods to utilize in front of guests, and you may be familiar with the concept from crème brûlée. This is a quick method that gives you greater command of browning, especially with foods that have uneven surface area. It's best to place your protein on a baking rack atop a baking tray that's resting on a heat-safe surface (like a stovetop range, trivet, or thick cutting board). This will protect your countertops as well as give you the best access to the entire surface area of the meat without moisture buildup at the base. See this video:
- Using a Searzall - Inventor and chef Dave Arnold designed this torch attachment, and it creates a shallow, diffused flame through two layers of very fine stainless steel mesh. The consistent and shallow flame hits only the surface in wide swaths, so your protein will not have much of a layer of greater-doneness at all. The guidelines provided for the torch method also apply to the Searzall method.
-
Countertop panini press/griddle/grill - Most of these machines are able to get from 425ºF - 500ºF/218ºC - 260ºC, which is plenty hot enough for a quick sear. Turn your machine’s temperature to the highest setting and let it warm up while closed. When the “ready” light most are equipped with comes on, place your meat inside, again remembering to not crowd the plate. You want at least 1”/2.5cm between the pieces. This is also a method that will cook your meat QUICKLY, so make sure to limit the time in the closed press to 1 minute. NOTE: Of all the methods, this one produced the least smoke and had very quick and beautiful results! It might be the best way to sear a steak after sous vide.

How to Minimize Smoke from Searing
Indoor searing can create problems due to the propensity for smoke creation. Luckily, there are ways to reduce that by choosing specific searing methods, being particular about the type of oil you use, and utilizing less oil overall. Pan-searing tends to create the most smoke, followed by broiling, then the torch methods, and finally the countertop pain press/griddle, which creates the least. Always use an oil with a higher smoke point if possible, and use just enough to coat the pan unless you are intentionally deep-frying. This method was not explored in this post, but we can definitely review in the future.Pan-Searing Step-by-Step
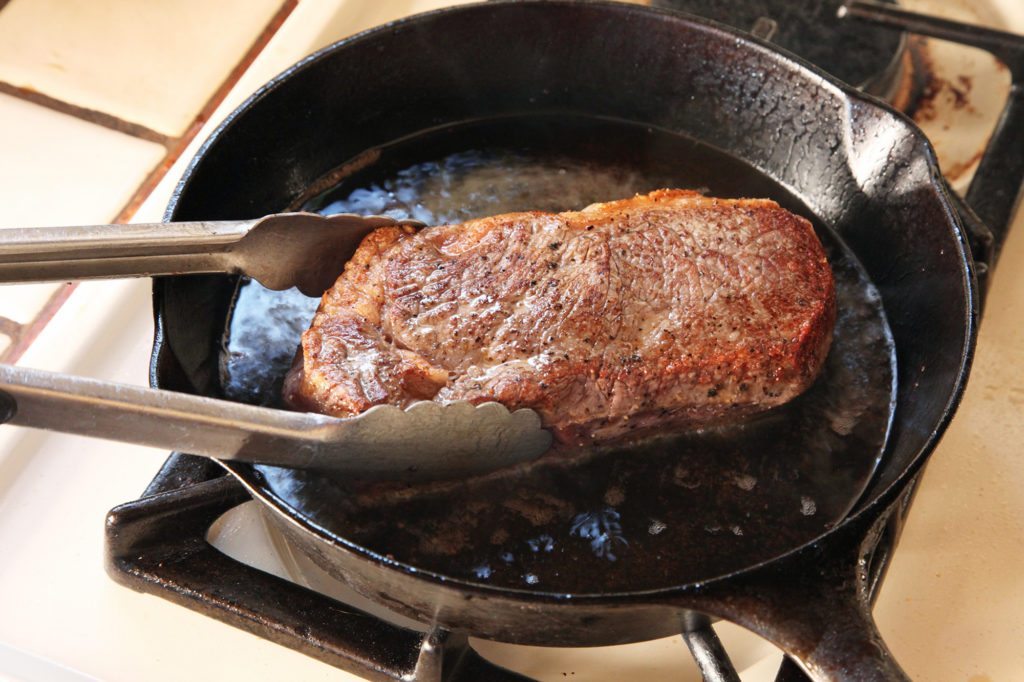
In preparation, we cooked a 1"/2.5cm boneless, organic grassfed ribeye in a 131ºF/55ºC bath for 2 hours, straight from the freezer.

Take your sous vide meat out of the bag and place on a paper-towel or towel-lined plate to draw moisture out of the bottom.
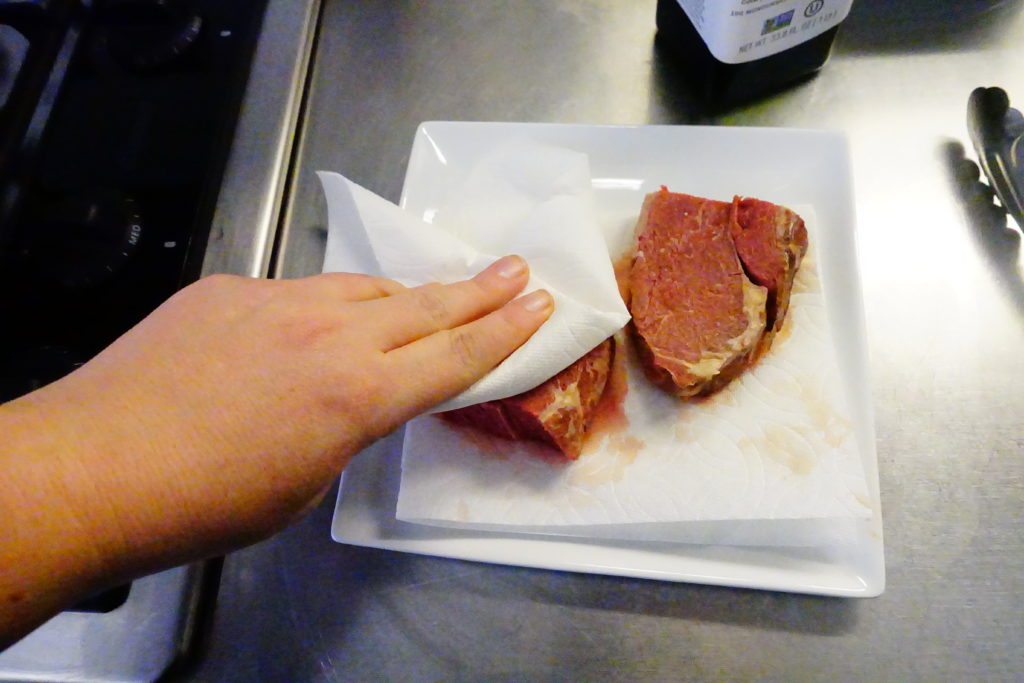
Pat the surface of the meat dry.
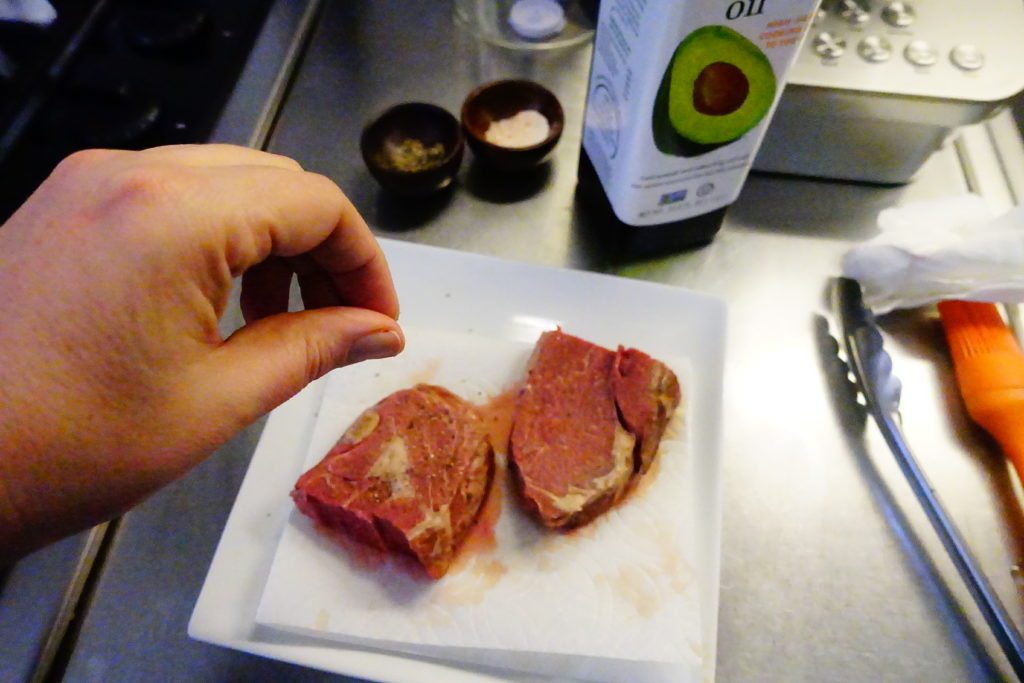
Season with salt, pepper, and any spices you would like prominently featured.
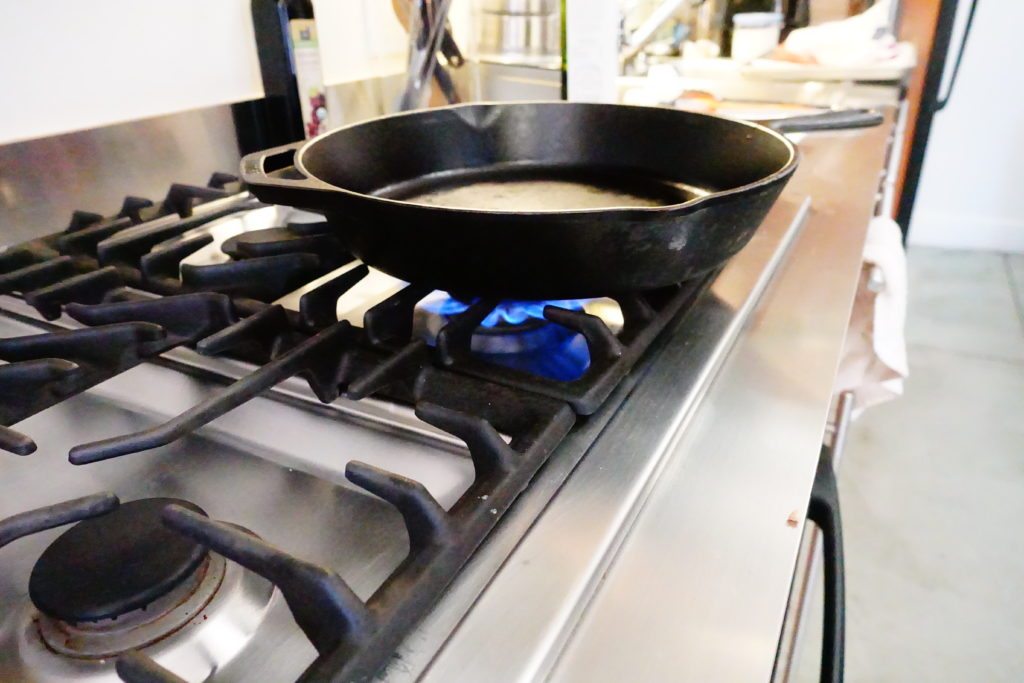
Heat your pan over high heat to get scorching hot. A drop of water added should sizzle and evaporate almost immediately.

Add your oil. We recommend using one with a high smoke point and only a little bit. We used 1 teaspoon/5ml avocado oil for a 12"/30.5cm cast iron skillet.

Spread the oil around the pan either by lifting, tilting, and swirling pan itself, or using a silicon brush.

Place the meat in the hot pan. Let sit for a minimum of 45 seconds before attempting to flip.

Flip and repeat treatment. This steak in particular required 90 seconds per side. We checked at 45 seconds and placed searing-side-down again for another 45 seconds.
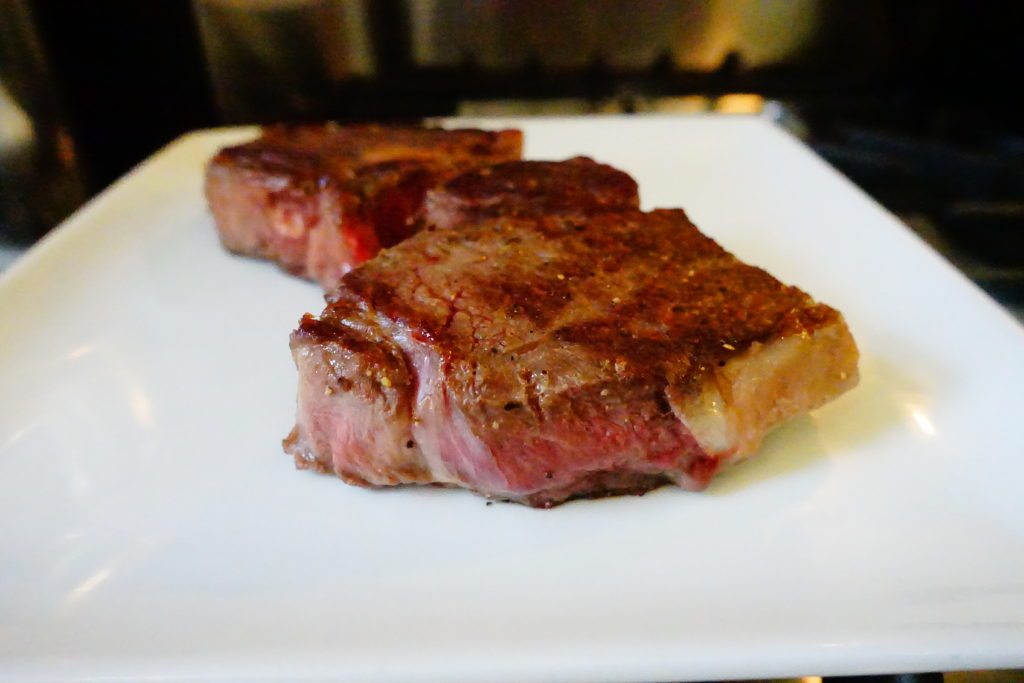
Once you are satisfied with the color, remove from the pan.

1 comment
Are you familiar with and if so, what is the metode of ‘square the thickness to find the sous vide time’?