

Why do you sear?
With Anova, the protein is cooked perfectly from edge-to-edge, and all it's missing is that beautiful crispy crust. Often, with fish or poultry, a sear may not be necessary, but for most steak and pork dishes, it's the final step on a delicious adventure. What we are in search of is the magnificent Maillard reaction, that beautiful char on the surface that packs some punch in the flavor department.
How do you sear?
More often that not, people sear indoors with either a hot pan, a torch, or possibly a specialized device like a Searzall. You can check out our indoor searing guide for all things inside. For this, we're hitting the road...er, the porch and getting down and dirty with some real flames. The Maillard reaction takes place above 300°F / 149°C, and rest assured we'll be getting well above that!Prep for searing
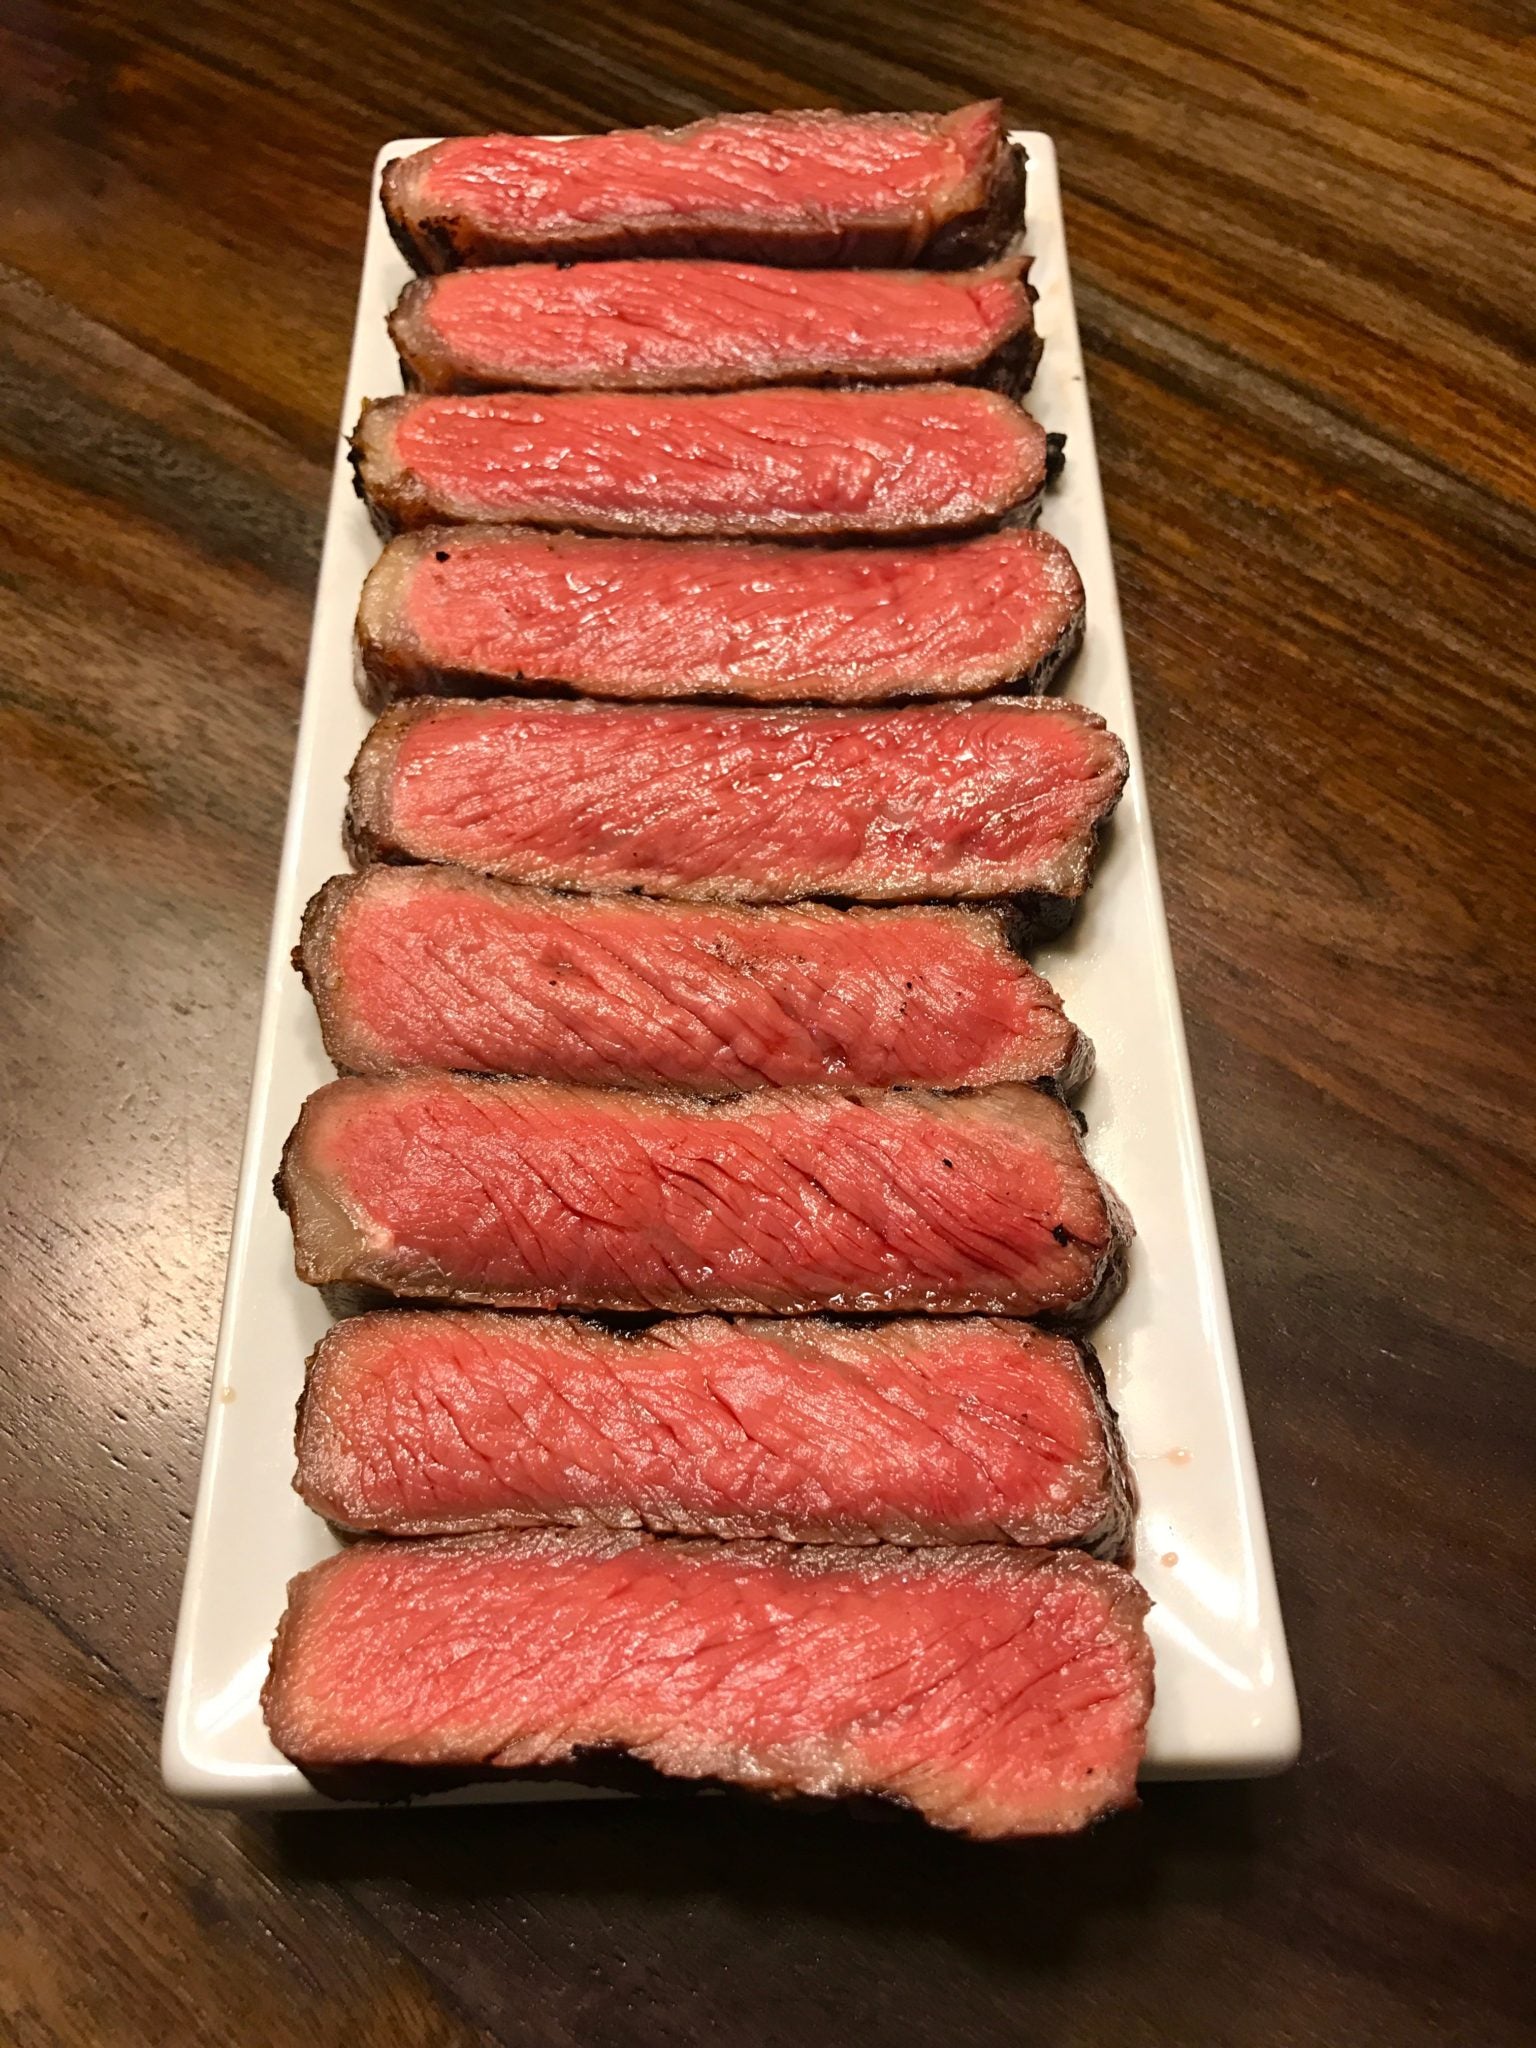
All of the steaks in this guide will have been cooked the same. 129°F / 53.9°C for one hour, per the Anova Recipes Site and the Anova App. Prior to searing, remove the steaks from the bag and dry thoroughly before letting them air dry for about 5-10 minutes while you prep your preferred searing method. Immediately before searing, season with salt and proceed on.Method #1: Grill
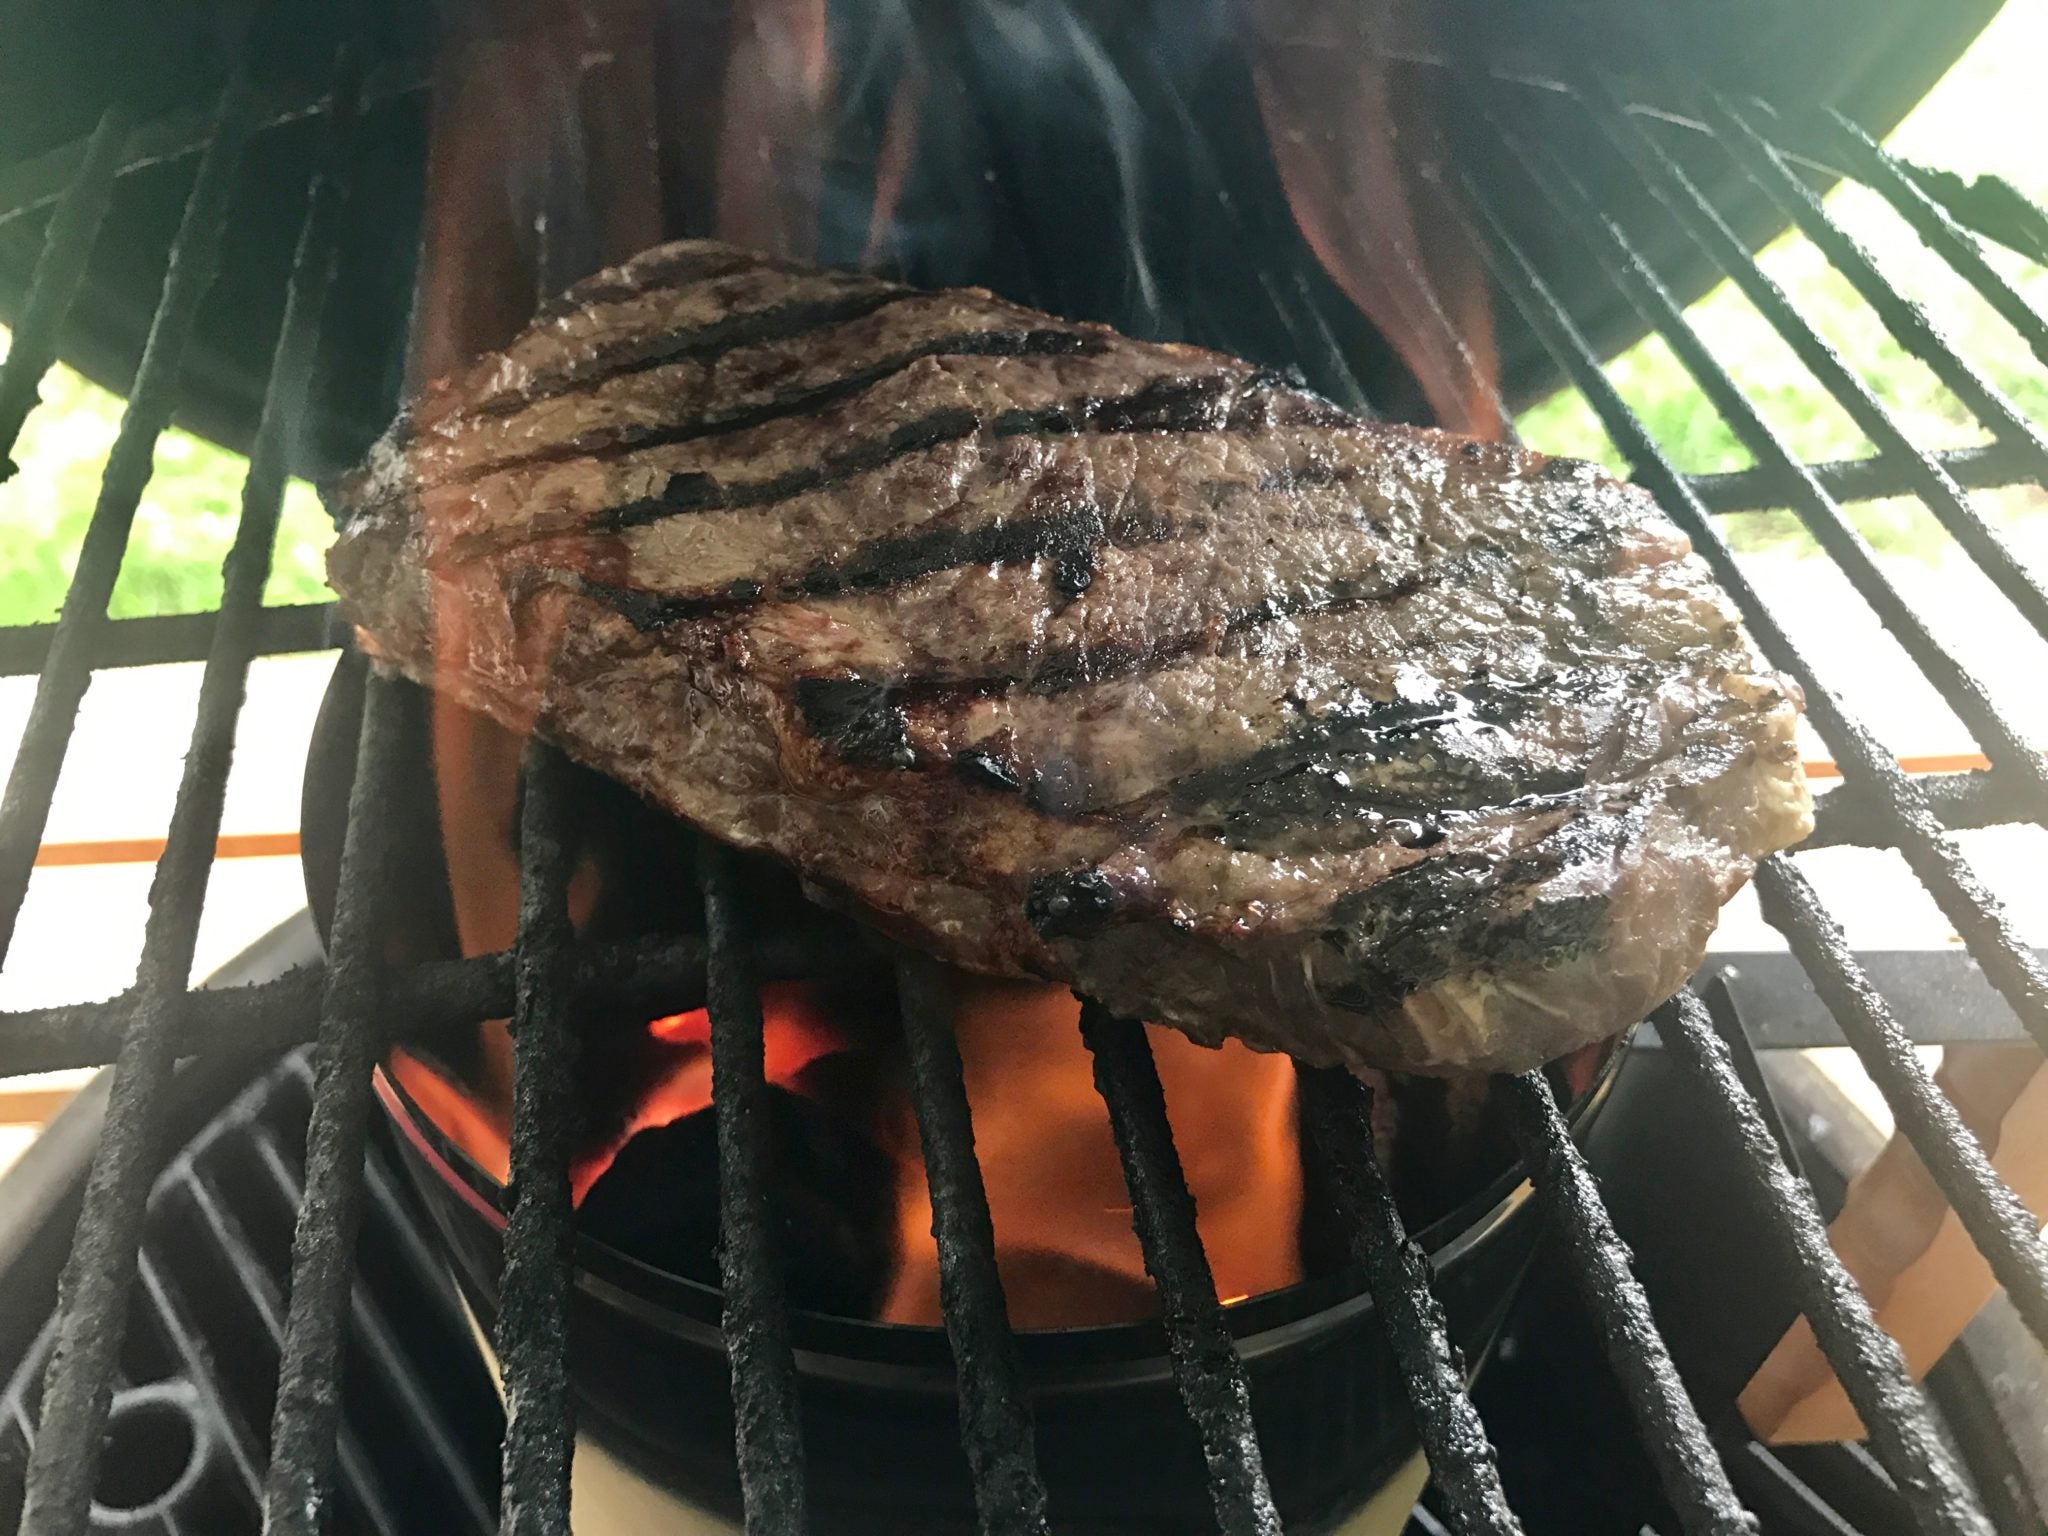
When searing on a charcoal grill, you are looking for 600°F /315°C or greater for a wicked awesome sear. Some grills don't have this capability, so anything over 400°F will suffice. With the higher temp, you achieve a nice crust very quickly, reducing the chance of overcooking. At a lower temperature, you will achieve a beautiful exterior crust, albeit after a longer period of time, thus increasing chance of a slight overcooked band. Faster and hotter is the way to go, if at all possible. Prep the grill for direct heat, as hot as you can get it. Always wear grilling/BBQ gloves when working near a hot grill! Once the grill is blazing, place steak on the grates for 60 seconds. Next, if you wanna get fancy, you can turn the steak 90 degrees after 30 seconds to get some gorgeous grill marks! After 60 seconds, carefully flip the steak with tongs and sear an additional 60 seconds. The result should be a beautiful dark brown crust with nice char marks all over!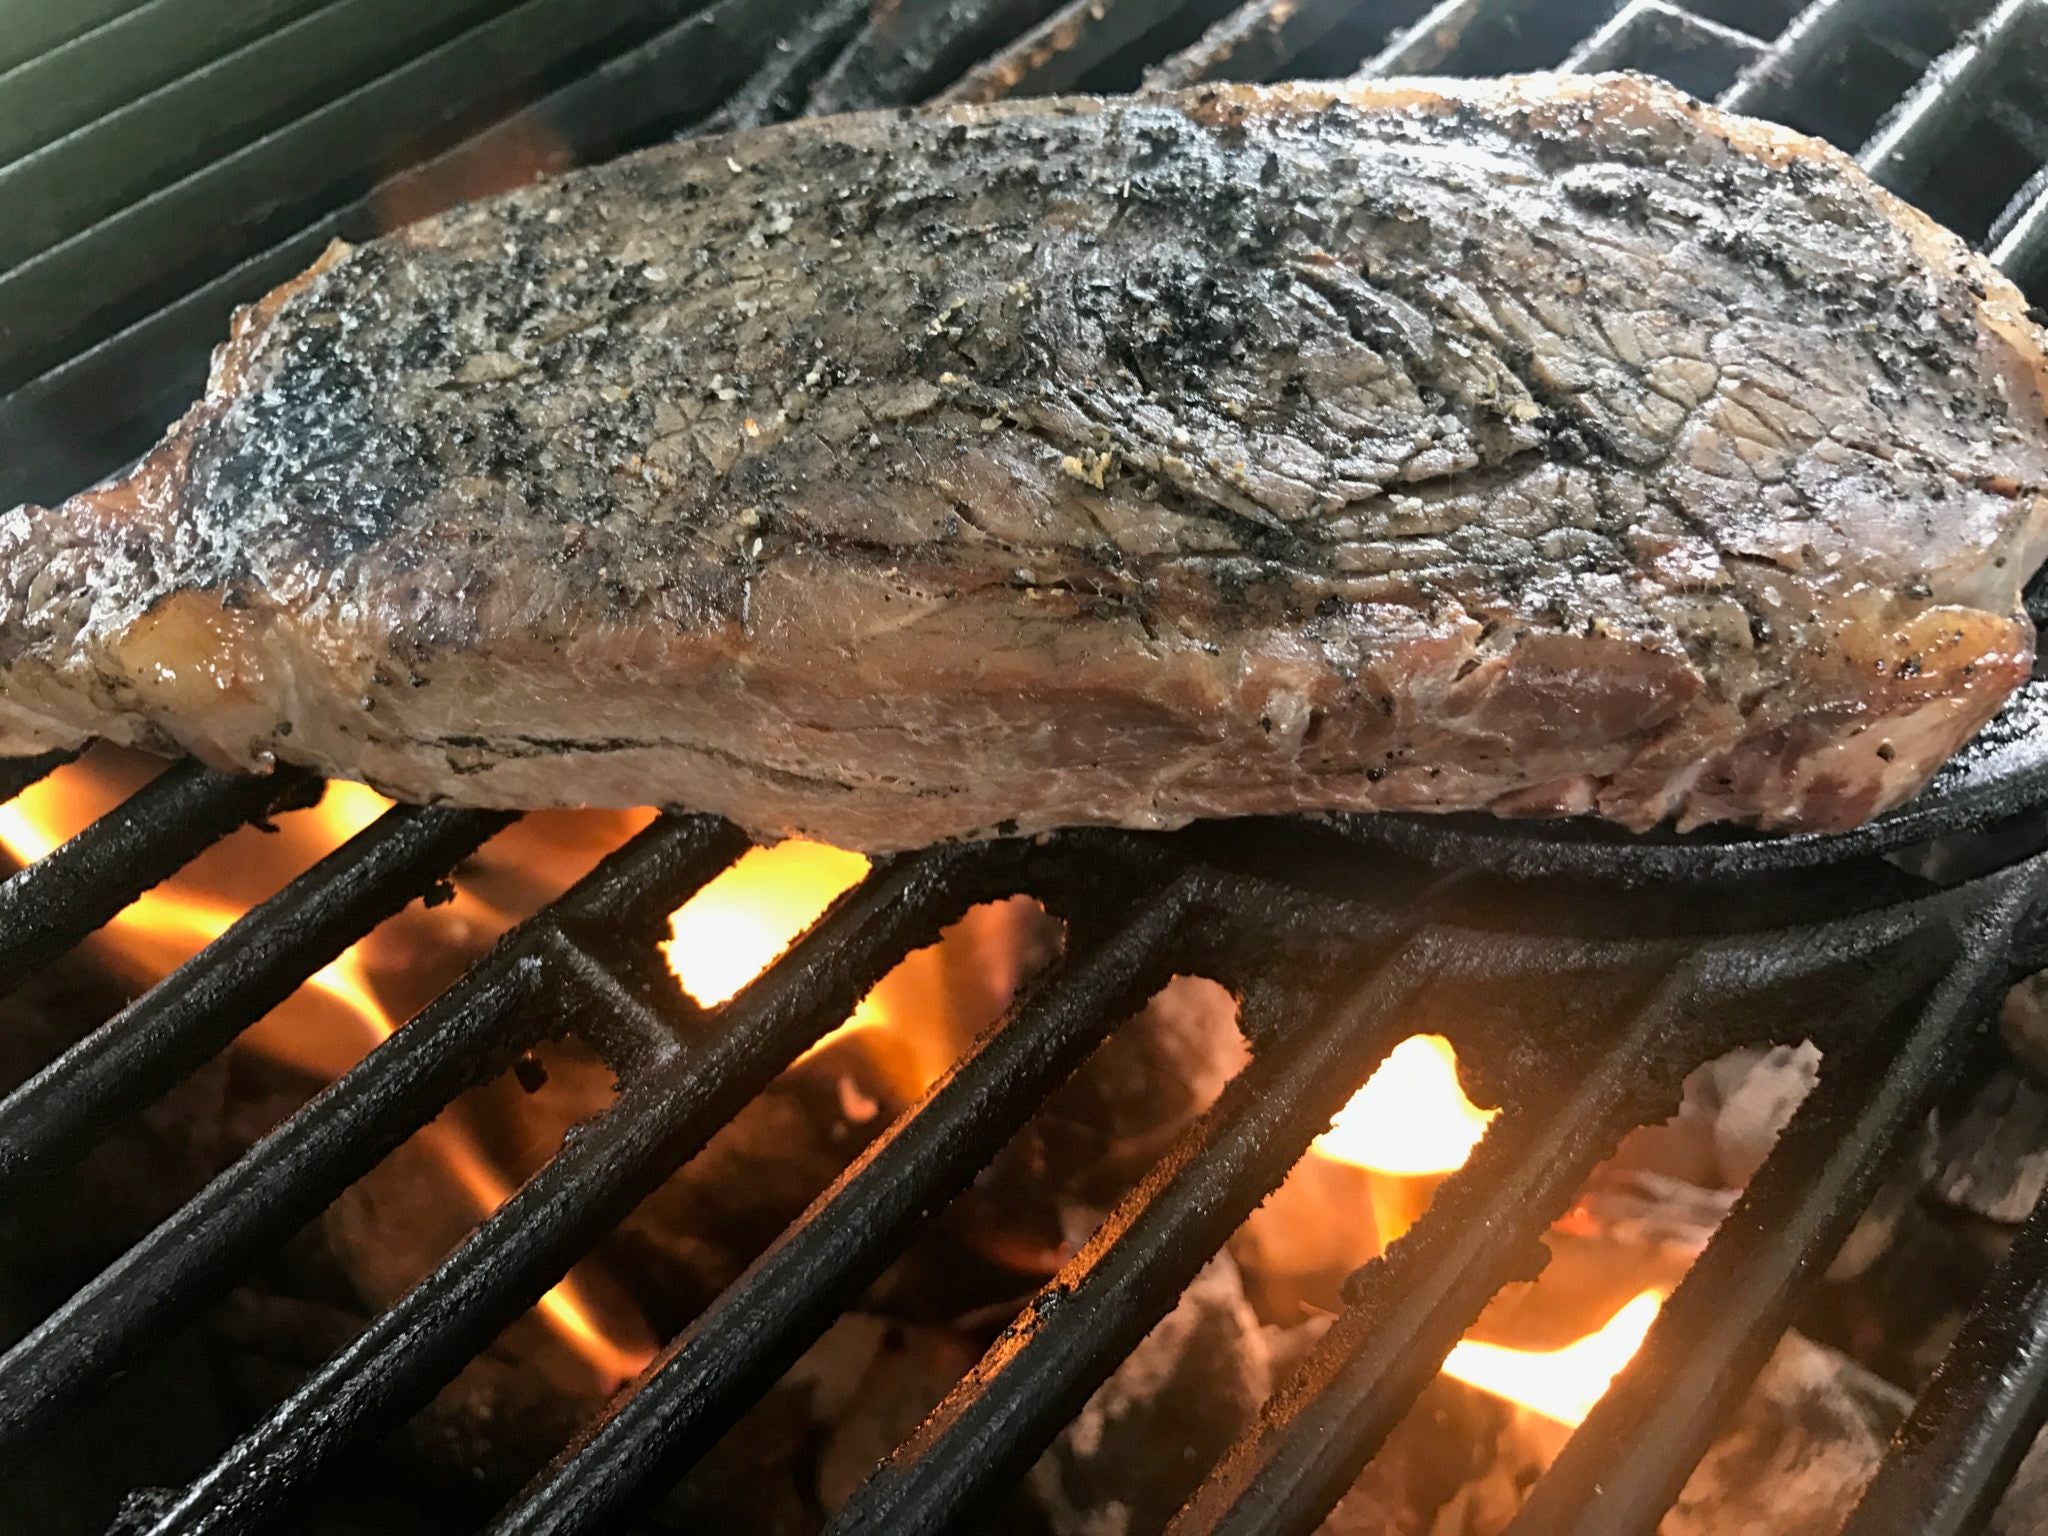
Being the most popular choice for outdoor searing, grilling remains a great way to get the job done. Short of just being FUN, it allows you to get that nice charcoal finish so many people love in a steak, with NONE of the hassle or guesswork required in traditional grilling.

Method #2: Charcoal Chimney
The idea behind a charcoal chimney is essentially the same as a grill, extremely high heat in a concentrated area. Typically used to light a lot of charcoal at once to then place into your grill, a chimney can be used to sear as well. A chimney can be purchased at any big box retailer, local hardware store, or online for around $15, and is a great tool to have in your sous vide arsenal.
Charcoal is poured into the chimney, newspaper placed into the chamber below and then set onto your grill grates for safety. Using a lighter or torch to ignite the newspaper, the charcoal quickly becomes very hot. Again, as with grill searing, 600°F/315°C and above is the name of the game. Unfortunately, there will be no temperature gauge on the chimney like there will be on your grill. You can use an infrared thermometer to determine temp. If that isn't available to you, no worries! When the charcoal is nice and white and just beginning to be ashy, you're ready to rock. Place an additional grill grate on top of the chimney, and place the steak on the grate right above the charcoal. Again, please use caution and wear gloves when handling hot charcoal and metal.

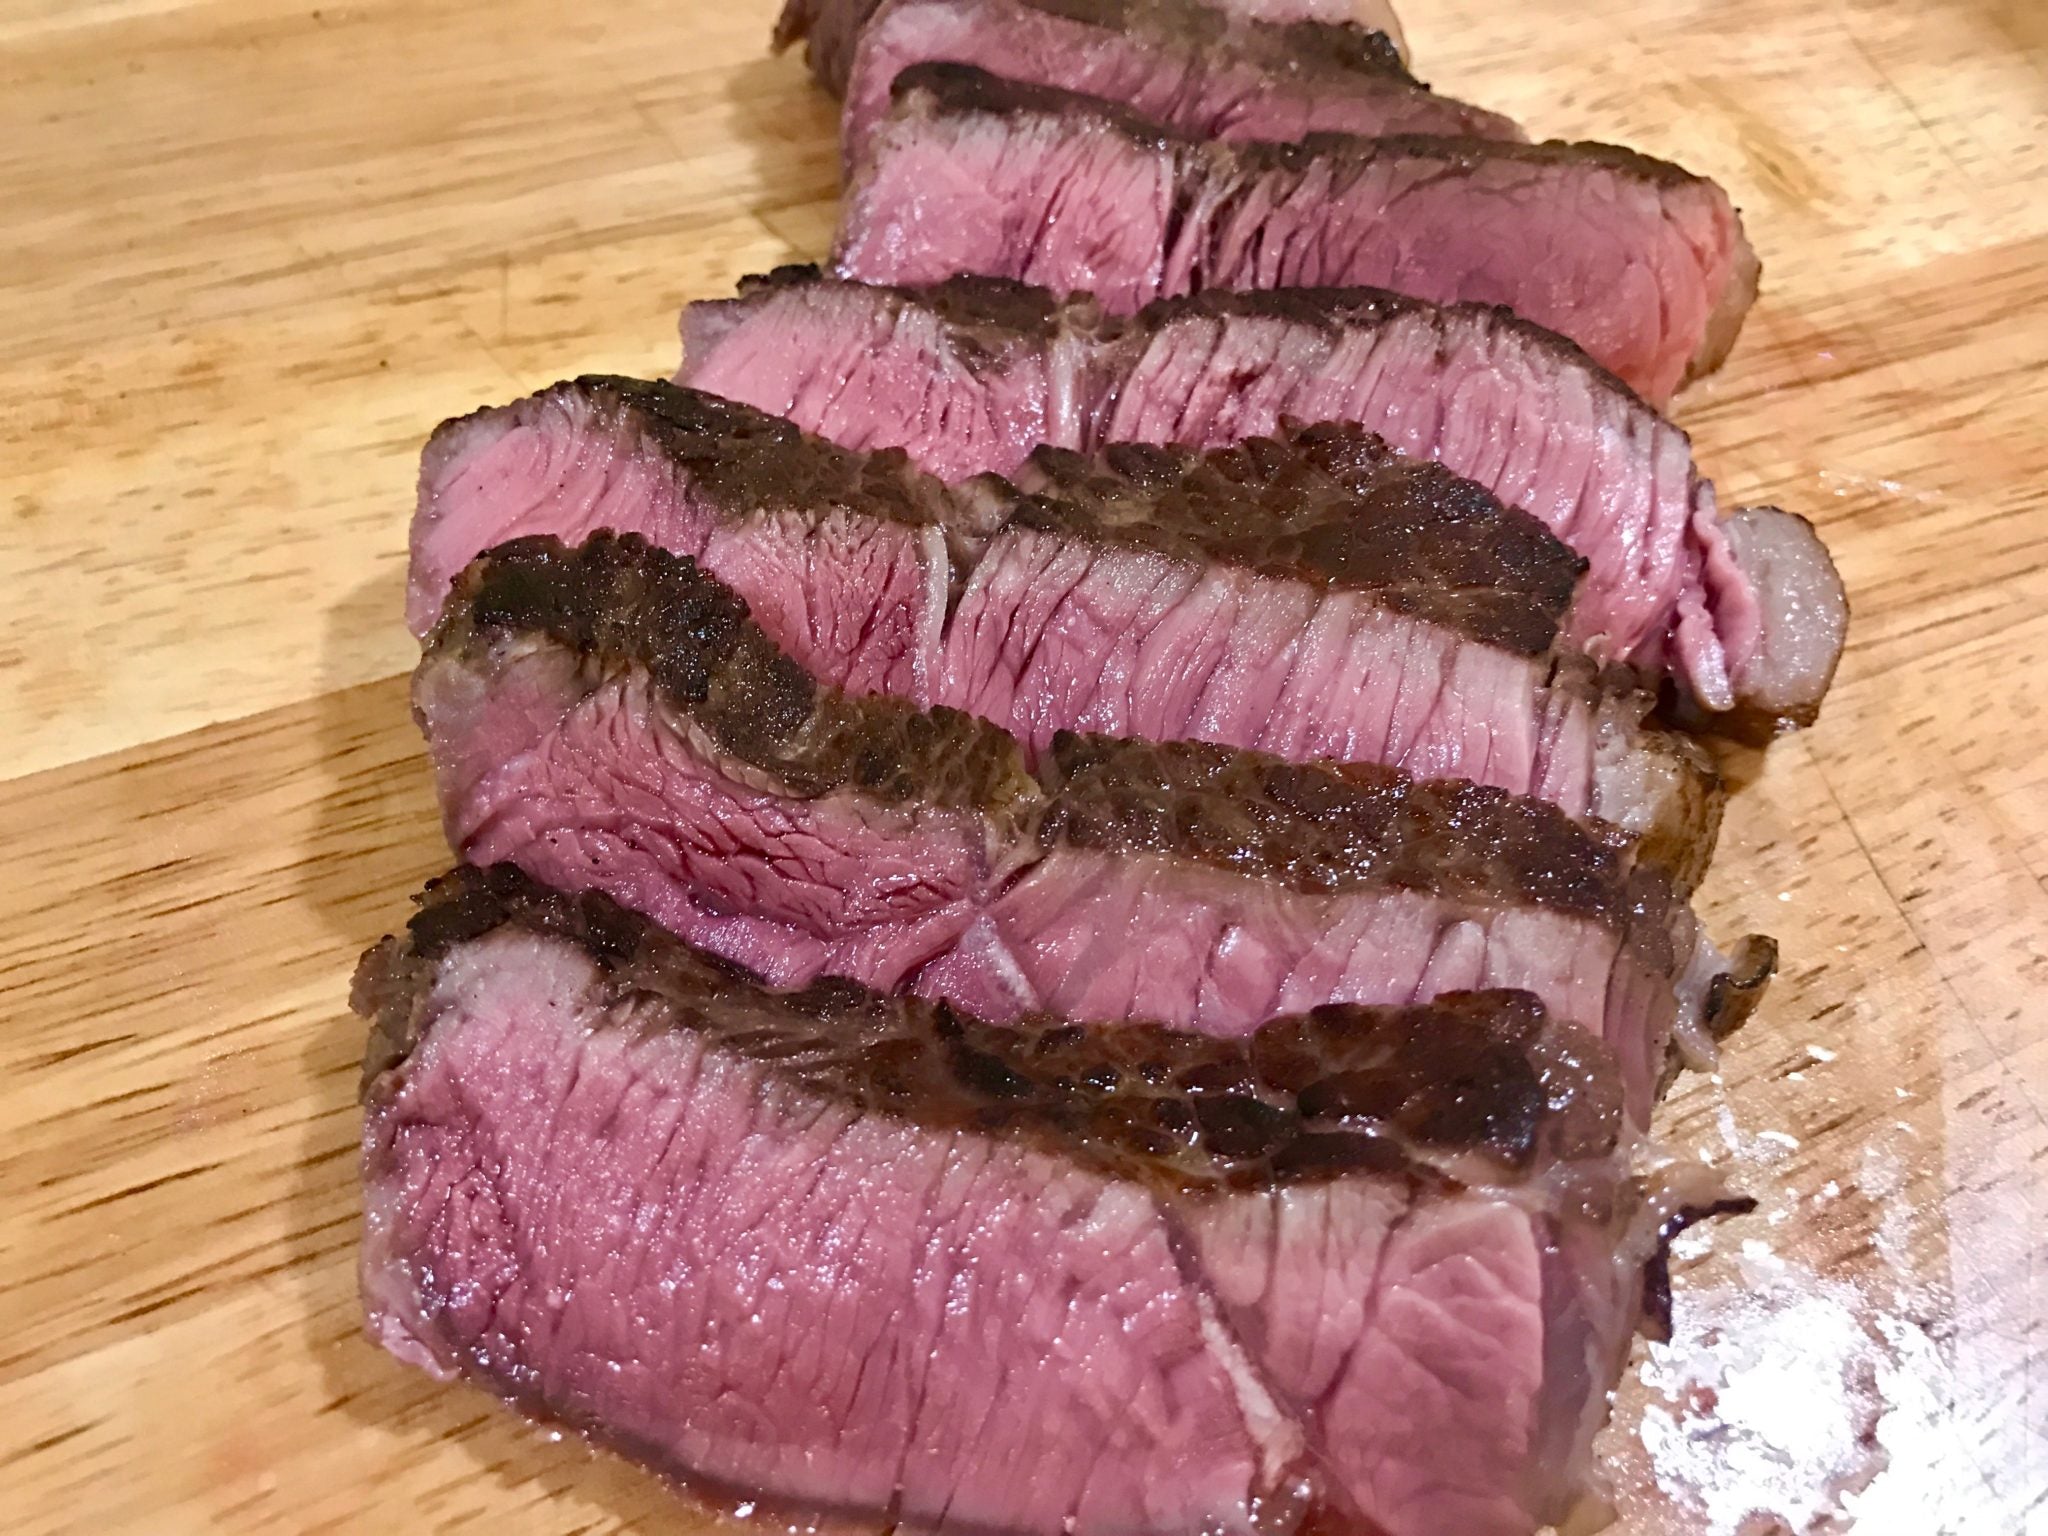
One minute per side is all you need for a beautiful crust! The benefits of the chimney method allow you to not have to fire up the entire grill for a steak or two, but still providing all the heat necessary. A small bundle of charcoal and your chimney, along with last Sunday's sports page is all you need. https://youtu.be/kwA4k79YNls When the steak is done searing, you should notice a deep brown color. The best news? After only a minute per side the interior is still PERFECTLY cooked!
The benefits to the charcoal chimney sear are many. Most notably few pieces of equipment are required, and the set-up is fairly easy and quick. The results are also great! You get the same charcoal and smoke flavor as you do on the grill without having to fire up the whole grill.
Method #3: Propane Burner with cast-iron skillet
A cast-iron skillet finish is one of the best ways to give your steak that crispy finish you are seeking. Oftentimes our indoor stoves don't have proper ventilation required for a cast-iron sear, because it can get super-smoky. Enter, the propane burner. Coming it at nearly 100,000 BTU's it packs plenty of punch to get that steak sizzling. You'll find these at most hardware retailers, often used for frying turkeys or for a crawfish boil. They hook right up to a propane tank you may already have for a gas grill, and they produce quite the flame!
Preheat your skillet for 10-15 minutes until it's too hot to hold your hand above it for more than second or two. One difference here than in the first two methods is you're going to need to apply some oil to the exterior of the steak to promote browning and keep it from possibly sticking to the skillet. You can choose any oil you would like, but the higher the smoke point, the less smoke you will have! You can reference the list below for some different options.

After you've selected your oil, use a silicone brush to coat the steak with oil, or drizzle about a tablespoon over the steak and rub it in really well. From here, it's sizzling time! Very carefully, place the steak in the pan and sear for one minute per side. It's very possible there will be quite a bit of smoke, but hey, you're outside! The results? Impeccable doneness through and through with a crispy and crunchy sear.
Which method is best?
All three methods provide their own set of pros, and really, there aren't any cons! Whichever option you choose is going to allow the already perfectly-cooked steaks to achieve that charred up and crispy exterior you're seeking. What are your favorite searing methods? Anything we missed here? Leave your favorite options in the comments below, and be sure to show off your juicy steaks on social media by tagging #anovafoodnerd! You can find all of your steak recipe needs on the Anova Recipes Site. Check out our previously published comprehensive indoor searing guide to find the best options for you.